Installation Guide
Follow these simple steps to set up Synco and connect your Shopify store with Odoo ERP.
Step 1: Install the App
- Go to the Shopify App Store
- Search for "Synco Shopify Odoo Connector"
- Click "Add App"
- Follow the installation prompts to add the app to your Shopify store
- Grant necessary permissions when prompted
Step 2: Choose Your Plan
After successful installation, you'll be redirected to select a subscription plan:
- Starter Plan: Perfect for small stores with basic sync needs
- Professional Plan: Ideal for growing businesses with advanced features
- Enterprise Plan: Best for large operations with custom requirements
Choose the plan that best fits your business needs and budget. You can always upgrade or downgrade later as your requirements change.
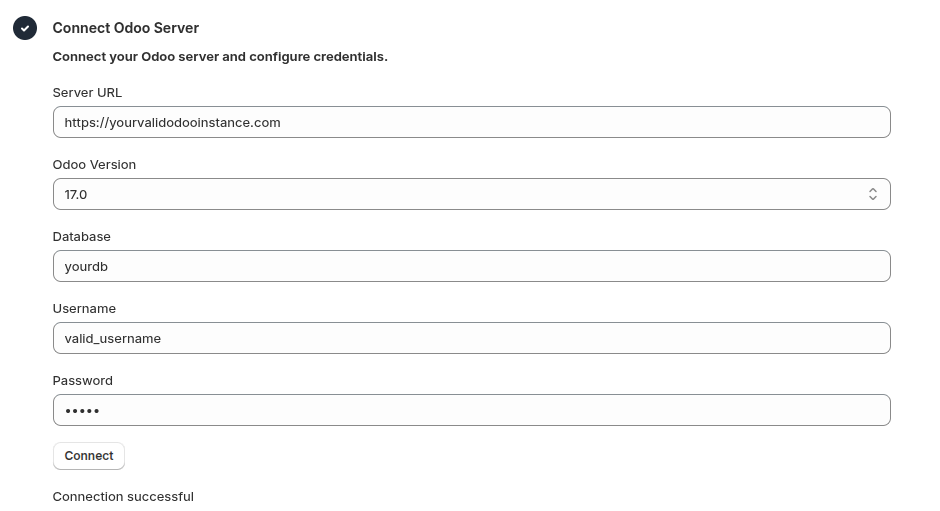
Step 3: Connect Your Odoo Server
3.1 Configure Odoo Connection
-
Enter Odoo Server Details:
- Server URL: Your Odoo instance URL (e.g.,
https://yourcompany.odoo.com) - Odoo Version: Select your Odoo version from the dropdown
- Database Name: Enter your Odoo database name
- Username: Your Odoo login username
- Password: Your Odoo login password
- Server URL: Your Odoo instance URL (e.g.,
-
Click "Connect" to verify the settings
3.2 Verify Required Odoo Modules
After successfully connecting to your Odoo server, you'll see a module verification screen that displays the status of required and optional Odoo modules.
Module Verification Required
Before proceeding, check that all required modules are installed in your Odoo instance. The sync functionality for Inventory, Orders, and Customers depends on these modules. Ensure all required modules show as "Installed" before continuing with the setup. If any required module is missing, install it in your Odoo instance before moving ahead.
The verification screen will show:
-
Required Modules: Essential modules needed for seamless synchronization
- Inventory Module: Required for stock/inventory synchronization
- Sales/Orders Module: Required for order synchronization
- Customer Module: Required for customer data synchronization
-
Optional Modules: Additional modules that enhance functionality (if available)
Module Status Indicators:
- ✅ Installed: Module is present and ready to use
- ❌ Not Installed: Module is missing and needs to be installed in Odoo
3.3 Select Company

- Choose the Odoo company you want to sync with
- This will be your primary company for all synchronization operations
3.4 Map Locations
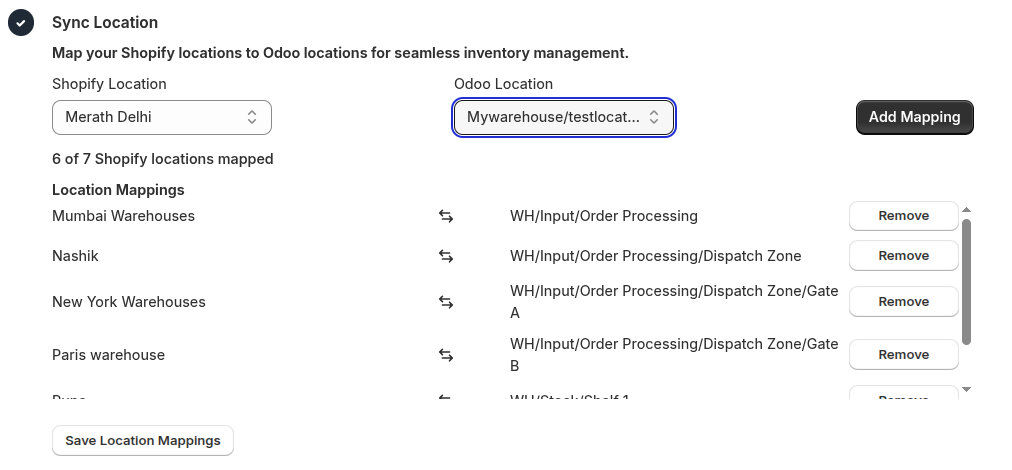
Location Mapping Requirement
All Shopify locations must be mapped to corresponding Odoo locations with a 1:1 relationship.
- Navigate to Location Mapping section
- For each Shopify location:
- Select the corresponding Odoo warehouse/location
- Ensure each mapping is unique (no duplicates)
- Optional: If you need to create a new physical location in Odoo, use the "Create Location" option. This allows you to create a physical location based on a selected parent location in Odoo.
Save Location Mapping
Click "Save Location Mapping" - This step is mandatory to save your location mapping settings. Your selections will not be saved until you click this button.
Step 4: Sync Products
Automatic Product Sync
- Go to Product Status page
- Click "Sync Products" button
- The system will automatically sync all products from Shopify to Odoo
Manual Product Mapping (Optional)
If you need more control over product synchronization:
- Click "Add Mapping" option
- Select a Shopify variant from the dropdown
- Map it to the corresponding Odoo product variant
- Repeat for all products that need manual mapping
- Click "Save Mappings"
Step 5: Automatic Synchronization
Once the initial setup is complete, the following data will be automatically synchronized:
- Customers: New customers and updates will sync in real-time
- Inventory: Stock levels will update based on your location mappings
- Orders: New orders will automatically appear in Odoo
Next Steps
After completing the installation:
- Verify Sync: Check that your products, customers, and inventory are properly synced
- Test Order Flow: Create a test order to ensure the complete workflow functions correctly
- Monitor Dashboard: Use the Synco dashboard to monitor sync status and resolve any issues